Local testing using a Mock contract
This guide explains how to test Chainlink VRF v2.5 on a Remix IDE sandbox blockchain environment. Note: You can reuse the same logic on another development environment, such as Hardhat. For example, read the Hardhat Starter Kit RandomNumberDirectFundingConsumer unit tests.
Benefits of local testing
Testing locally using mock contracts saves you time and resources during development. Some of the key benefits include:
- Faster feedback loop: Immediate feedback on the functionality and correctness of your smart contracts. This helps you quickly identify and fix issues without waiting for transactions to be mined/validated on a testnet.
- Saving your native testnet gas: Deploying and interacting with contracts requires paying gas fees. Although native testnet gas does not have any associated value, supply is limited by public faucets. Using mock contracts locally allows you to test your contracts freely without incurring any expenses.
- Controlled environment: Local testing allows you to create a controlled environment where you can manipulate various parameters, such as block time and gas prices, to test your smart contracts' function as expected under different conditions.
- Isolated testing: You can focus on testing individual parts of your contract, ensuring they work as intended before integrating them with other components.
- Easier debugging: Because local tests run on your machine, you have better control over the debugging process. You can set breakpoints, inspect variables, and step through your code to identify and fix issues.
- Comprehensive test coverage: You can create test cases to cover all possible scenarios and edge cases.
Testing logic
Complete the following tasks to test your VRF v2.5 consumer locally:
- Deploy the VRFCoordinatorV2_5Mock. This contract is a mock of the VRFCoordinatorV2_5 contract.
- Deploy the MockV3Aggregator contract.
- Deploy the LinkToken contract.
- Deploy the VRFV2PlusWrapper contract.
- Call the VRFV2PlusWrapper setConfig function to set wrapper specific parameters.
- Fund the VRFV2PlusWrapper subscription.
- Call the addConsumer function to add the wrapper contract to your subscription. (VRFCoordinatorV2_5Mock inherits this function from the IVRFSubscriptionV2Plus interface.)
- Deploy your VRF consumer contract.
- Fund your consumer contract with LINK tokens.
- Request random words from your consumer contract.
- Call the VRFCoordinatorV2_5Mock fulfillRandomWords function to fulfill your consumer contract request.
Preview the code (optional)
You can preview the code for the contracts you will deploy in this tutorial, or skip this step and proceed to setting up your test environment.
DirectFundingConsumerV2_5 is the consuming contract that requests and directly pays the VRF service for random values:
// SPDX-License-Identifier: MIT
// An example of a consumer contract that directly pays for each request.
pragma solidity 0.8.19;

import {ConfirmedOwner} from "@chainlink/contracts/src/v0.8/shared/access/ConfirmedOwner.sol";
import {VRFV2PlusWrapperConsumerBase} from "@chainlink/contracts/src/v0.8/vrf/dev/VRFV2PlusWrapperConsumerBase.sol";
import {VRFV2PlusClient} from "@chainlink/contracts/src/v0.8/vrf/dev/libraries/VRFV2PlusClient.sol";

/**
 * THIS IS AN EXAMPLE CONTRACT THAT USES HARDCODED VALUES FOR CLARITY.
 * THIS IS AN EXAMPLE CONTRACT THAT USES UNAUDITED CODE.
 * DO NOT USE THIS CODE IN PRODUCTION.
 */

contract DirectFundingConsumerV2_5 is
    VRFV2PlusWrapperConsumerBase,
    ConfirmedOwner
{
    event RequestSent(uint256 requestId, uint32 numWords, uint256 paid);
    event RequestFulfilled(
        uint256 requestId,
        uint256[] randomWords,
        uint256 payment
    );
    error InsufficientFunds(uint256 balance, uint256 calculatedRequestPrice);
    error RequestNotFound(uint256 requestId);
    error LinkTransferError(address sender, address receiver, uint256 amount);
    error FailedToWithdrawEth(address sender, address receiver, uint256 amount);
    error NothingToWithdraw();

    struct RequestStatus {
        uint256 paid; // amount paid in link
        bool fulfilled; // whether the request has been successfully fulfilled
        uint256[] randomWords;
    }
    mapping(uint256 => RequestStatus)
        public s_requests; /* requestId --> requestStatus */

    // past requests Id.
    uint256[] public requestIds;
    uint256 public lastRequestId;

    // configuration: https://docs.chain.link/vrf/v2-5/supported-networks
    constructor(
        address _wrapperAddress
    )
        ConfirmedOwner(msg.sender)
        VRFV2PlusWrapperConsumerBase(_wrapperAddress)
    {}

    // Depends on the number of requested values that you want sent to the
    // fulfillRandomWords() function. Test and adjust
    // this limit based on the network that you select, the size of the request,
    // and the processing of the callback request in the fulfillRandomWords()
    // function.
    // The default is 3, but you can set this higher.
    // For this example, retrieve 2 random values in one request.
    // Cannot exceed VRFV2PlusWrapper.getConfig().maxNumWords.
    function requestRandomWords(
        uint32 _callbackGasLimit,
        uint16 _requestConfirmations,
        uint32 _numWords,
        bool enableNativePayment
    ) external onlyOwner returns (uint256) {
        bytes memory extraArgs = VRFV2PlusClient._argsToBytes(
            VRFV2PlusClient.ExtraArgsV1({nativePayment: enableNativePayment})
        );
        uint256 requestId;
        uint256 reqPrice;
        if (enableNativePayment) {
            uint256 calculatedRequestPrice = i_vrfV2PlusWrapper
                .calculateRequestPriceNative(_callbackGasLimit, _numWords);
            uint256 balance = address(this).balance;
            if (calculatedRequestPrice > balance)
                revert InsufficientFunds(balance, calculatedRequestPrice);
            (requestId, reqPrice) = requestRandomnessPayInNative(
                _callbackGasLimit,
                _requestConfirmations,
                _numWords,
                extraArgs
            );
        } else {
            uint256 calculatedRequestPrice = i_vrfV2PlusWrapper
                .calculateRequestPrice(_callbackGasLimit, _numWords);
            uint256 balance = i_linkToken.balanceOf(address(this));
            if (calculatedRequestPrice > balance)
                revert InsufficientFunds(balance, calculatedRequestPrice);
            (requestId, reqPrice) = requestRandomness(
                _callbackGasLimit,
                _requestConfirmations,
                _numWords,
                extraArgs
            );
        }

        s_requests[requestId] = RequestStatus({
            paid: reqPrice,
            randomWords: new uint256[](0),
            fulfilled: false
        });
        requestIds.push(requestId);
        lastRequestId = requestId;
        emit RequestSent(requestId, _numWords, reqPrice);
        return requestId;
    }

    function fulfillRandomWords(
        uint256 _requestId,
        uint256[] memory _randomWords
    ) internal override {
        RequestStatus storage request = s_requests[_requestId];
        if (request.paid == 0) revert RequestNotFound(_requestId);
        request.fulfilled = true;
        request.randomWords = _randomWords;
        emit RequestFulfilled(_requestId, _randomWords, request.paid);
    }

    function getNumberOfRequests() external view returns (uint256) {
        return requestIds.length;
    }

    function getRequestStatus(
        uint256 _requestId
    )
        external
        view
        returns (uint256 paid, bool fulfilled, uint256[] memory randomWords)
    {
        RequestStatus memory request = s_requests[_requestId];
        if (request.paid == 0) revert RequestNotFound(_requestId);
        return (request.paid, request.fulfilled, request.randomWords);
    }

    /**
     * Allow withdraw of Link tokens from the contract
     */
    function withdrawLink(address _receiver) public onlyOwner {
        uint256 amount = i_linkToken.balanceOf(address(this));
        // Revert if there is nothing to withdraw
        if (amount == 0) revert NothingToWithdraw();

        bool success = i_linkToken.transfer(_receiver, amount);
        if (!success)
            revert LinkTransferError(
                msg.sender,
                _receiver,
                i_linkToken.balanceOf(address(this))
            );
    }

    function withdraw(address _receiver) public onlyOwner {
        // Retrieve the balance of this contract
        uint256 amount = address(this).balance;

        // Revert if there is nothing to withdraw
        if (amount == 0) revert NothingToWithdraw();

        // Attempt to send the funds, capturing the success status and discarding any return data
        (bool sent, ) = _receiver.call{value: amount}("");

        // Revert if the send failed, with information about the attempted transfer
        if (!sent) revert FailedToWithdrawEth(msg.sender, _receiver, amount);
    }

    receive() external payable {}
}
The other contracts are simply imported from their source in the chainlink/contracts npm package:
- The MockV3Aggregator contract allows you to simulate an oracle price feed without interacting with the existing Chainlink network.
// SPDX-License-Identifier: MIT pragma solidity 0.8.19; import "@chainlink/contracts/src/v0.8/tests/MockV3Aggregator.sol"; - Deploying LinkToken in your test environment allows you to mock transferring LINK to test contracts.
// SPDX-License-Identifier: MIT pragma solidity 0.8.19; import "@chainlink/contracts/src/v0.8/mocks/MockLinkToken.sol"; - As the VRF v2.5 direct funding end-to-end diagram explains, the VRFV2PlusWrapper acts as a wrapper for the coordinator contract.
// SPDX-License-Identifier: MIT pragma solidity 0.8.19; import "@chainlink/contracts/src/v0.8/vrf/dev/VRFV2PlusWrapper.sol"; - This contract mocks the VRF V2.5 Coordinator contract.
// SPDX-License-Identifier: MIT
pragma solidity 0.8.19;
import "@chainlink/contracts/src/v0.8/vrf/mocks/VRFCoordinatorV2_5Mock.sol";
Prerequisites
This guide will require you to finetune the gas limit when fulfilling requests. When writing, manually setting up the gas limits on Remix IDE is not supported, so you will use Remix IDE in conjunction with MetaMask.
Hardhat lets you run an Ethereum blockchain locally for testing. Use the Hardhat Starter Kit to quickly fire up a personal Ethereum blockchain.
-
Install the Hardhat Starter Kit and its dependencies:
git clone https://github.com/smartcontractkit/hardhat-starter-kit/ cd hardhat-starter-kit && npm install -
At the root directory of
hardhat-starter-kit, start an Ethereum blockchain locally:npx hardhat nodeThe output includes the RPC server and the addresses and private keys for 20 test accounts. The first one is shown below. First, make sure to note the RPC server. In this example, the RPC server is
http://127.0.0.1:8545/:Started HTTP and WebSocket JSON-RPC server at http://127.0.0.1:8545/ Accounts ======== WARNING: These accounts, and their private keys, are publicly known. Any funds sent to them on Mainnet or any other live network WILL BE LOST. Account #0: 0xf39Fd6e51aad88F6F4ce6aB8827279cffFb92266 (10000 ETH) Private Key: 0xac0974bec39a17e36ba4a6b4d238ff944bacb478cbed5efcae784d7bf4f2ff80 ... WARNING: These accounts, and their private keys, are publicly known. Any funds sent to them on Mainnet or any other live network WILL BE LOST.After the test account information, you will see output indicating that the Ethereum blockchain is running locally:
eth_blockNumber (14) eth_chainId (6) eth_blockNumber (2) eth_getBalance (3) eth_getBlockByNumber eth_blockNumber net_version (2) eth_chainId -
Follow the MetaMask official guide to add a custom network manually.
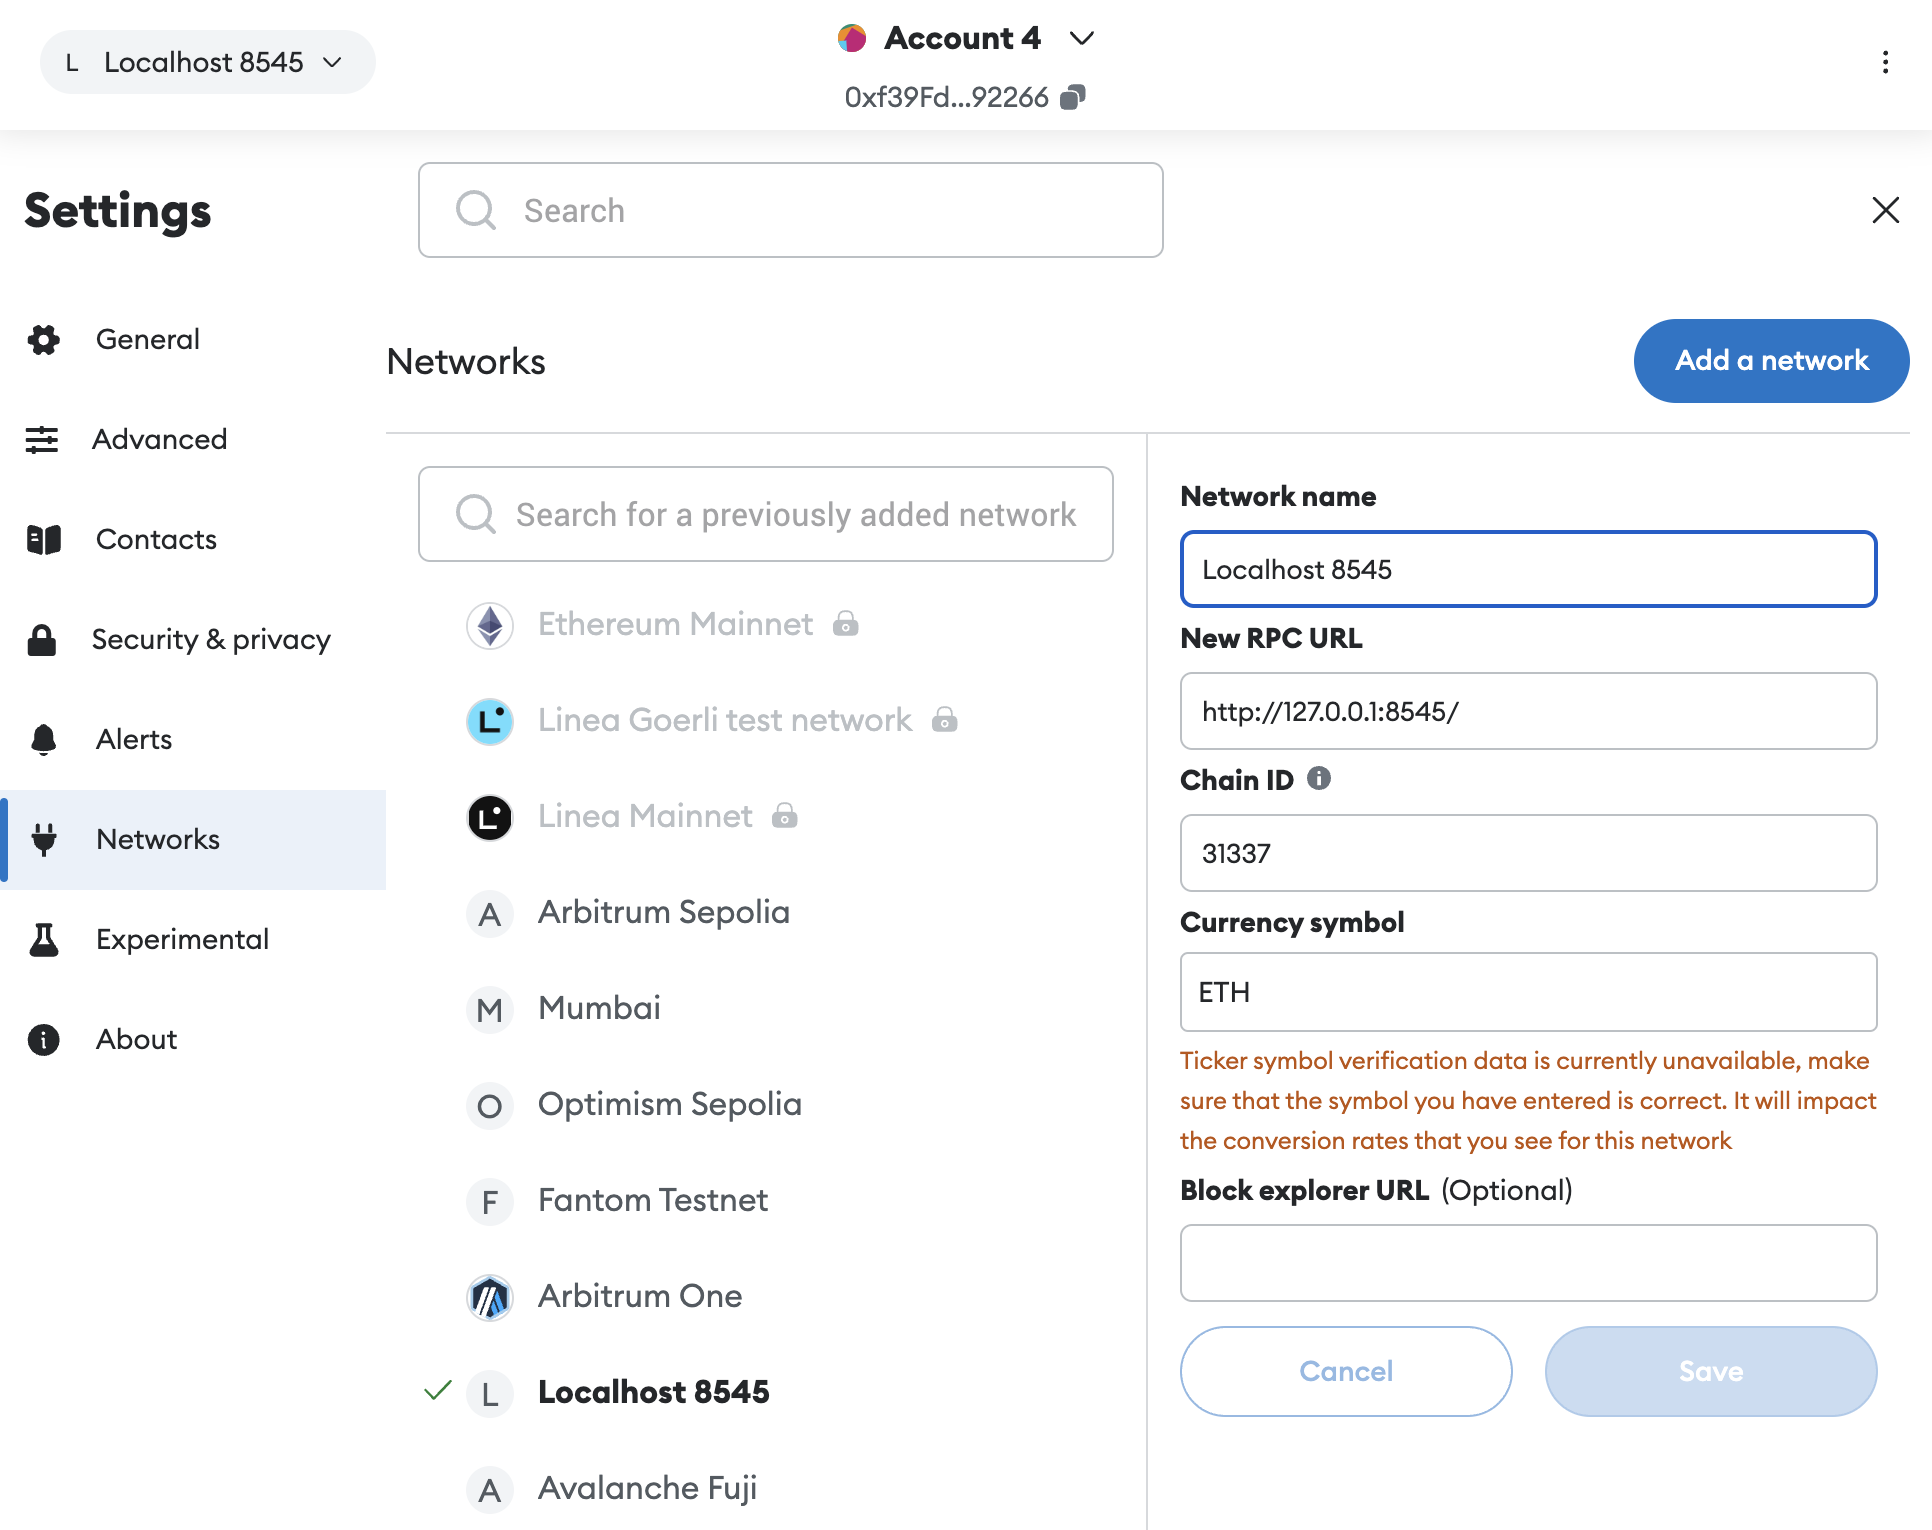
-
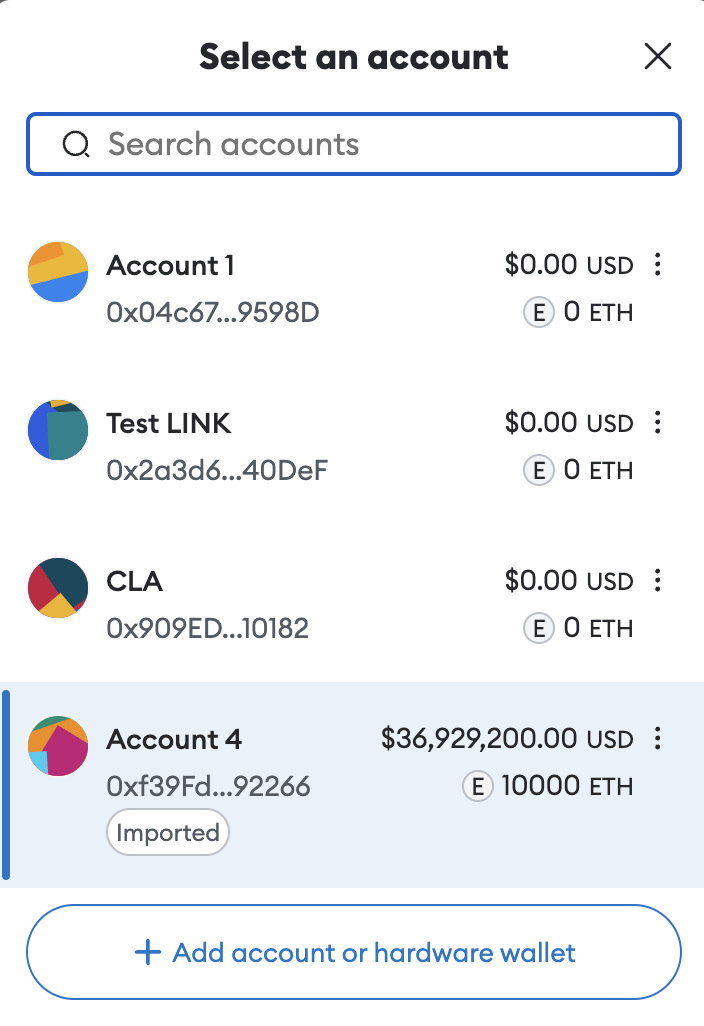
Import the first Hardhat test account into MetaMask.
-
In the terminal window where you're running the local Ethereum blockchain, scroll up in the output to the test account information. Copy the private key for the first account:
Started HTTP and WebSocket JSON-RPC server at http://127.0.0.1:8545/ Accounts ======== WARNING: These accounts, and their private keys, are publicly known. Any funds sent to them on Mainnet or any other live network WILL BE LOST. Account #0: 0xf39Fd6e51aad88F6F4ce6aB8827279cffFb92266 (10000 ETH) Private Key: 0xac0974bec39a17e36ba4a6b4d238ff944bacb478cbed5efcae784d7bf4f2ff80 ... -
Follow the MetaMask official guide to import an account using a private key.
-
Your MetaMask is connected to the Hardhat test account, and you should have access to the newly imported account.
-
Testing
Open the contracts in Remix IDE
For this tutorial, there are five contracts to open within the same Remix workspace. The fastest way to do this is to clone the documentation repo locally, and then in Remix, upload the specific subdirectory of sample code used for both local testing tutorials (public/samples/VRF/mock/v2-5). (Alternatively, you can open one of the contracts in Remix, and then add the other four contracts manually within the same directory. All the code is shown in the optional code preview.)
-
Clone the documentation repo:
git clone https://github.com/smartcontractkit/documentation.git -
On the FILE EXPLORER tab, create a new Remix workspace for this tutorial, or use the default workspace.
-
Click the Upload folder button, navigate to where you cloned the
documentationrepo, and then select thepublic/samples/VRF/mock/v2-5subdirectory.
-
Remix prompts you to confirm that you would like to upload 6 files from
v2-5. Click Upload.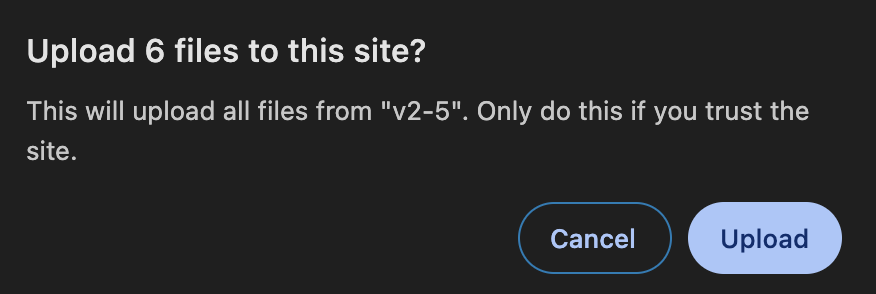
-
Your Remix file explorer should show the
v2-5directory containing all the contracts you need for this tutorial. The VRFv2_5Consumer.sol file is not used in this tutorial, so you can delete it from your Remix workspace: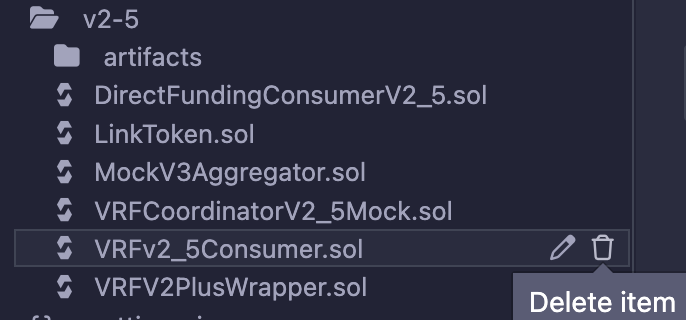
-
Your Remix file explorer shows only the five contracts you need for this tutorial:
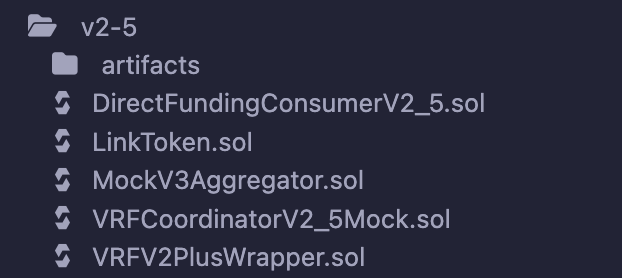
-
Click the name of each file to open the code in your Remix file explorer. Remix flags some errors that we resolve in the next section.
Compile the contracts
In this section, you will make a few adjustments to compile all of the contracts. Remix indicates that each contract is compiled successfully with a green checkmark icon on the SOLIDITY COMPILER tab. Otherwise, it shows a yellow "warning" icon or a red "error" icon.
- In Remix, within the FILE EXPLORER tab, select the DirectFundingConsumerV2_5 contract.
- Navigate to the SOLIDITY COMPILER tab and select version
0.8.19: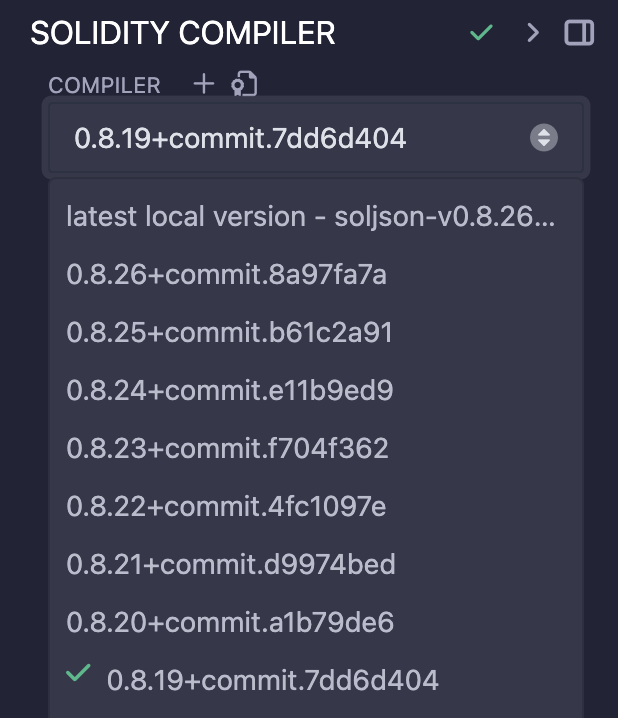
- Compile DirectFundingConsumerV2_5.sol: click the blue Compile DirectFundingConsumerV2_5.sol button or use your keyboard shortcut for "save" (Ctrl+S or Command+S).
- In the FILE EXPLORER tab, select the VRFCoordinatorV2_5Mock.sol contract.
- In the Solidity Compiler tab, you will see a warning indicating that the contract size is too large to deploy. Expand the Advanced Configurations section and check the Enable optimization box, using the default
200runs: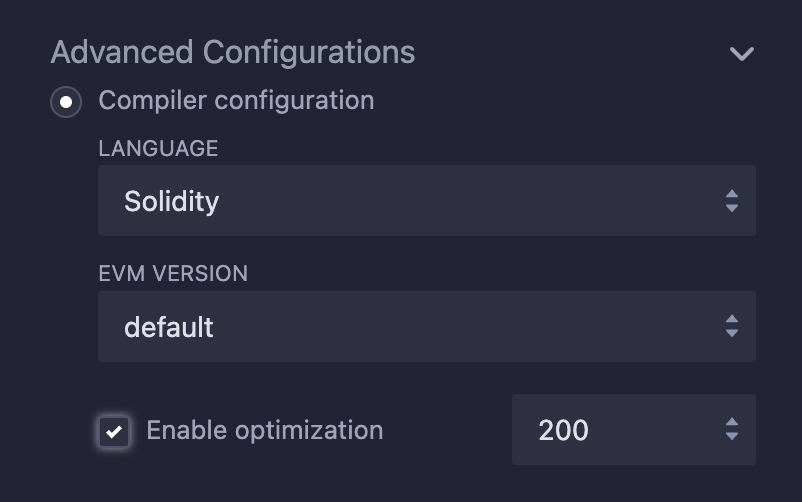
- Compile the VRFCoordinatorV2_5Mock contract.
- In the FILE EXPLORER tab, select the MockV3Aggregator.sol contract, and then compile it using your "save" keyboard shortcut.
- Select LinkToken.sol and compile it using your "save" keyboard shortcut.
- Compiling VRFV2PlusWrapper.sol currently requires a workaround to resolve its Solidity version mismatch with
Ownableusing0.8.20:- In the FILE EXPLORER tab, navigate to
OVM_GasPriceOracle.sol. The full path is@chainlink/contracts/src/v0.8/vendor/@eth-optimism/contracts/v0.8.9/contracts/L2/predeploys/OVM_GasPriceOracle.sol: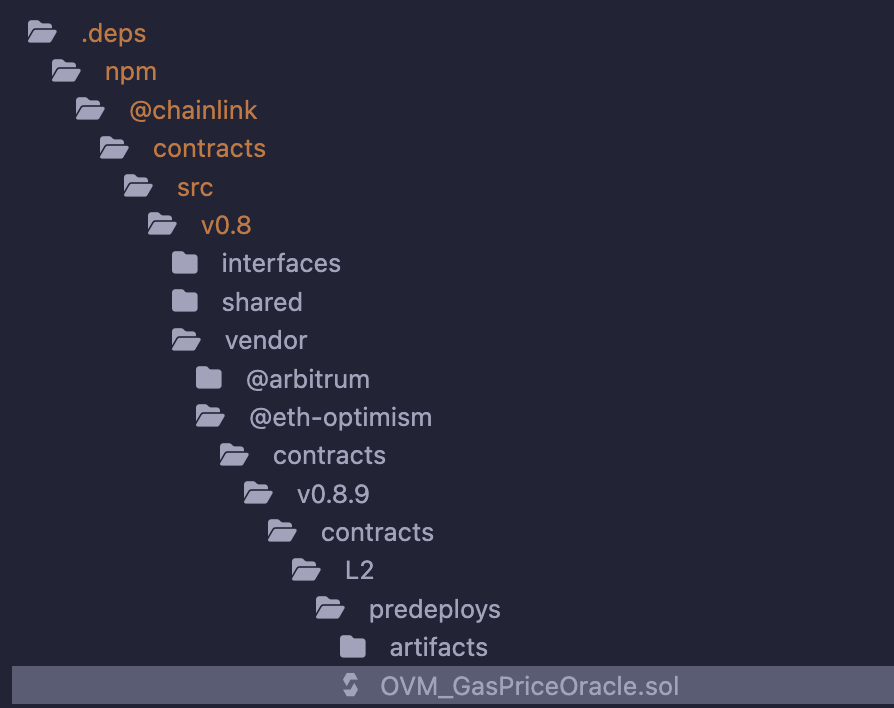
- At the top of this file, change the import statement to:
import {Ownable} from "@openzeppelin/contracts@4.9.6/access/Ownable.sol"; - VRFV2PlusWrapper.sol successfully compiles when this dependency uses an earlier version of
Ownable.sol.
- In the FILE EXPLORER tab, navigate to
Select the correct Remix IDE environment
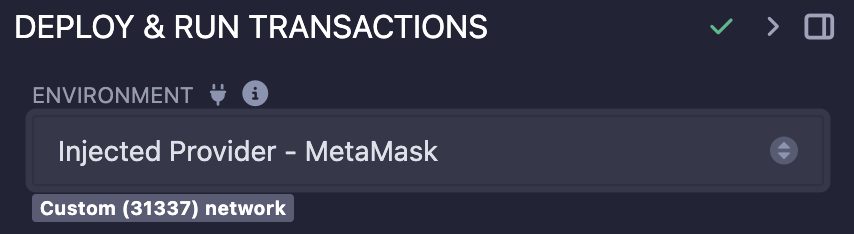
Under DEPLOY & RUN TRANSACTIONS:
-
Set the Environment to Injected Provider - MetaMask:
-
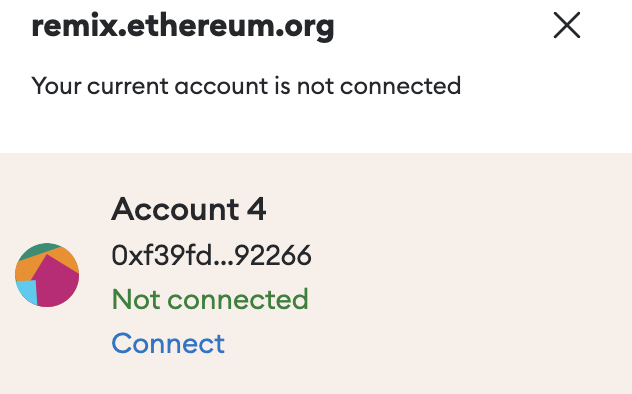
On MetaMask, connect your Hardhat test account to the Remix IDE.
-
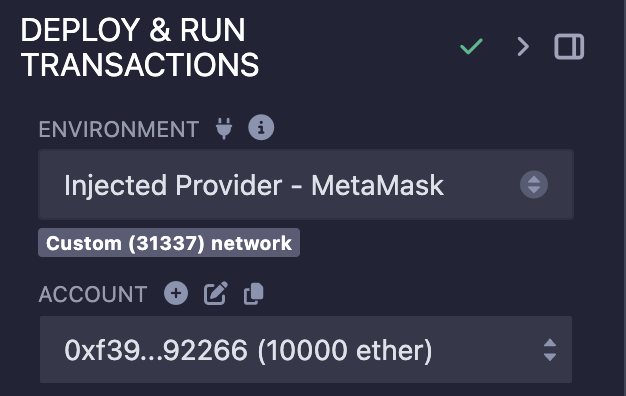
Click Connect. The Remix IDE environment should be set to the correct environment, and the account should be the Hardhat test account.
Deploy VRFCoordinatorV2_5Mock
-
Open VRFCoordinatorV2_5Mock.sol.
-
Under DEPLOY & RUN TRANSACTIONS, select VRFCoordinatorV2_5Mock.

-
Under DEPLOY, fill in the
_BASEFEE,_GASPRICELINKand_WEIPERUNITLINK. These variables are used in the VRFCoordinatorV2_5Mock contract to represent the base fee, the gas price (in LINK tokens), and the current LINK/ETH price for the VRF requests.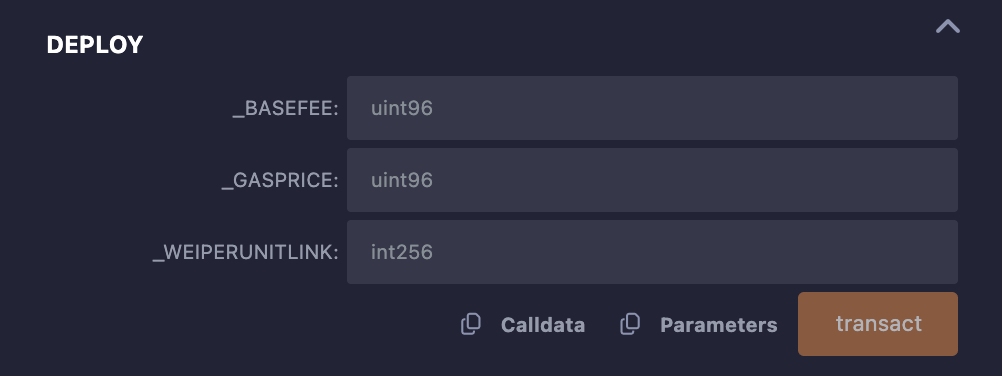
You can set:
_BASEFEEto100000000000000000_GASPRICELINKto1000000000_WEIPERUNITLINKto the current LINK/ETH price. Click the "Latest Price" button to view it:Latest Price
-
Click transact to deploy the VRFCoordinatorV2Mock contract.
-
A MetaMask popup will open. Click Confirm.
-
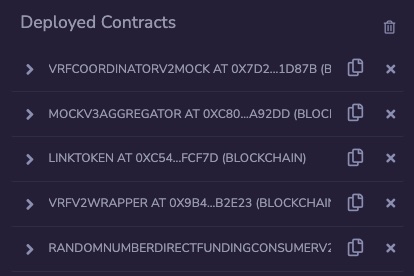
Once deployed, you should see the VRFCoordinatorV2Mock contract under Deployed Contracts.
-
Note the address of the deployed contract.
Create a subscription
- In the Deployed Contracts section, expand your deployed VRFCoordinatorV2Mock contract.
- Click the orange createSubscription button and confirm the transaction in MetaMask.
- The output or logs for this function may not show the resulting subscription ID in Remix. Click the blue getActiveSubscriptionIds button and fill in
0forstartIndexand1formaxCount. This will display the subscription ID for the subscription you just created: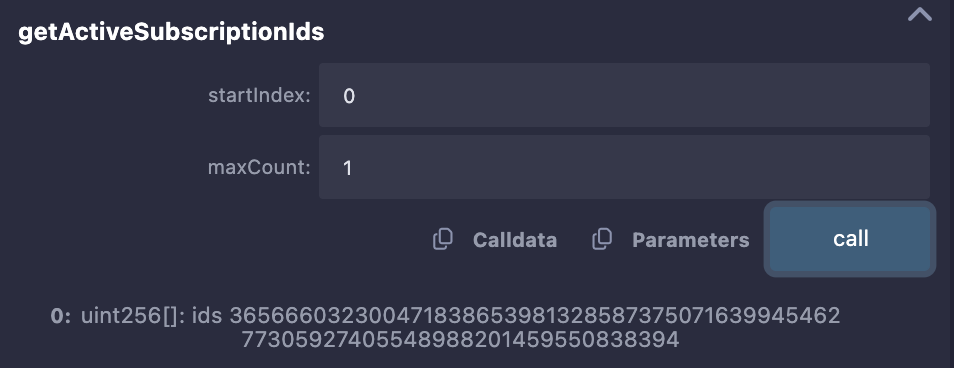
Deploy MockV3Aggregator
The MockV3Aggregator contract is designed for testing purposes, allowing you to simulate an oracle price feed without interacting with the existing Chainlink network.
-
Open MockV3Aggregator.sol.
-
Under DEPLOY & RUN TRANSACTIONS, select MockV3Aggregator.
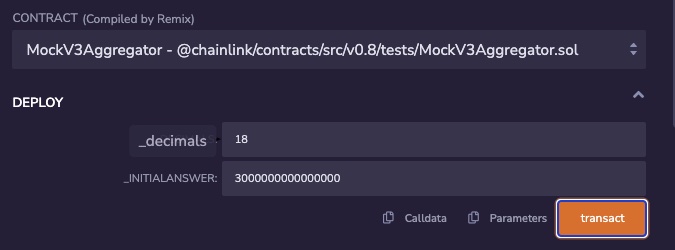
-
Under DEPLOY, fill in
_DECIMALSand_INITIALANSWER. These variables are used in the MockV3Aggregator contract to represent the number of decimals the aggregator's answer should have and the most recent price feed answer. You can set:_DECIMALS=18and_INITIALANSWER=3000000000000000(We are considering that1 LINK = 0.003 native gas tokens). -
Click transact to deploy the MockV3Aggregator contract.
-
A MetaMask popup will open. Click Confirm.
-
Once deployed, you should see the MockV3Aggregator contract under Deployed Contracts.
-
Note the address of the deployed contract.
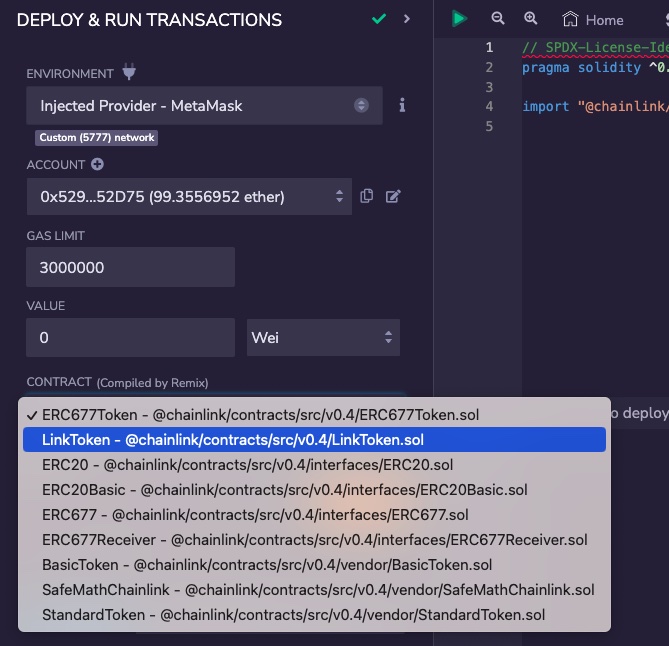
Deploy LinkToken
The Chainlink VRF v2.5 direct funding method requires your consumer contract to pay for VRF requests in LINK. Therefore, you have to deploy the LinkToken contract to your local blockchain.
-
Open LinkToken.sol.
-
Under DEPLOY & RUN TRANSACTIONS, select LinkToken.
-
Under DEPLOY, click transact to deploy the LinkToken contract.
-
A MetaMask popup will open. Click Confirm.
-
Once deployed, you should see the LinkToken contract under Deployed Contracts.
-
Note the address of the deployed contract.
Deploy VRFV2PlusWrapper
As the VRF v2.5 direct funding end-to-end diagram explains, the VRFV2PlusWrapper acts as a wrapper for the coordinator contract.
Unlike in VRF v2, the v2.5 wrapper contract requires an existing subscription ID for deployment, so you'll need to create a subscription first. If you missed it, create a subscription and then return to this section.
-
Open VRFV2PlusWrapper.sol.
-
Under DEPLOY & RUN TRANSACTIONS, select VRFV2PlusWrapper.
-
Under DEPLOY, fill in the following parameters:
-
_LINKwith the LinkToken contract address -
_LINKETHFEEDwith the MockV3Aggregator contract address -
_COORDINATORwith the VRFCoordinatorV2_5Mock contract address -
_SUBIDwith the subscription ID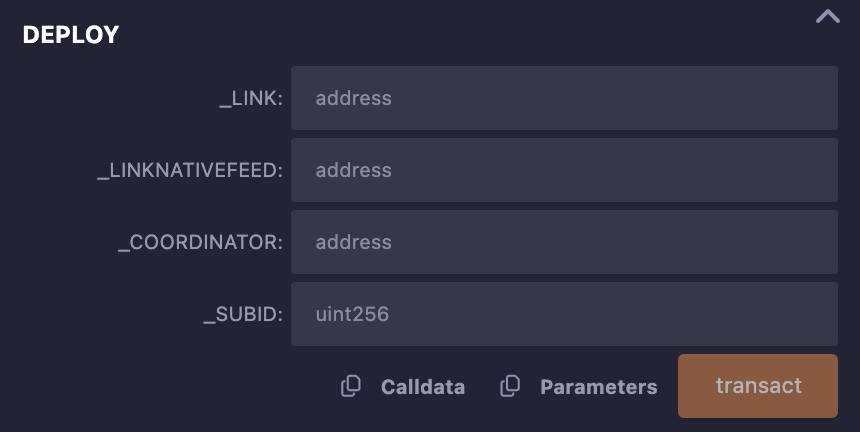
-
-
Click transact to deploy the VRFV2PlusWrapper contract.
-
A MetaMask popup will open. Click Confirm.
-
Once deployed, you should see the VRFV2PlusWrapper contract under Deployed Contracts.
-
Note the address of the deployed contract.
-
Add your newly deployed wrapper contract as a consumer to the subscription:
- In the Deployed Contracts section, expand your deployed VRFCoordinatorV2Mock contract.
- Click the addConsumer button and provide your subscription ID and the address of the wrapper contract you just deployed.
- Click transact and confirm the transaction in MetaMask.
Configure the VRFV2PlusWrapper
-
Under Deployed Contracts, open the functions list of your deployed VRFV2PlusWrapper contract.
-
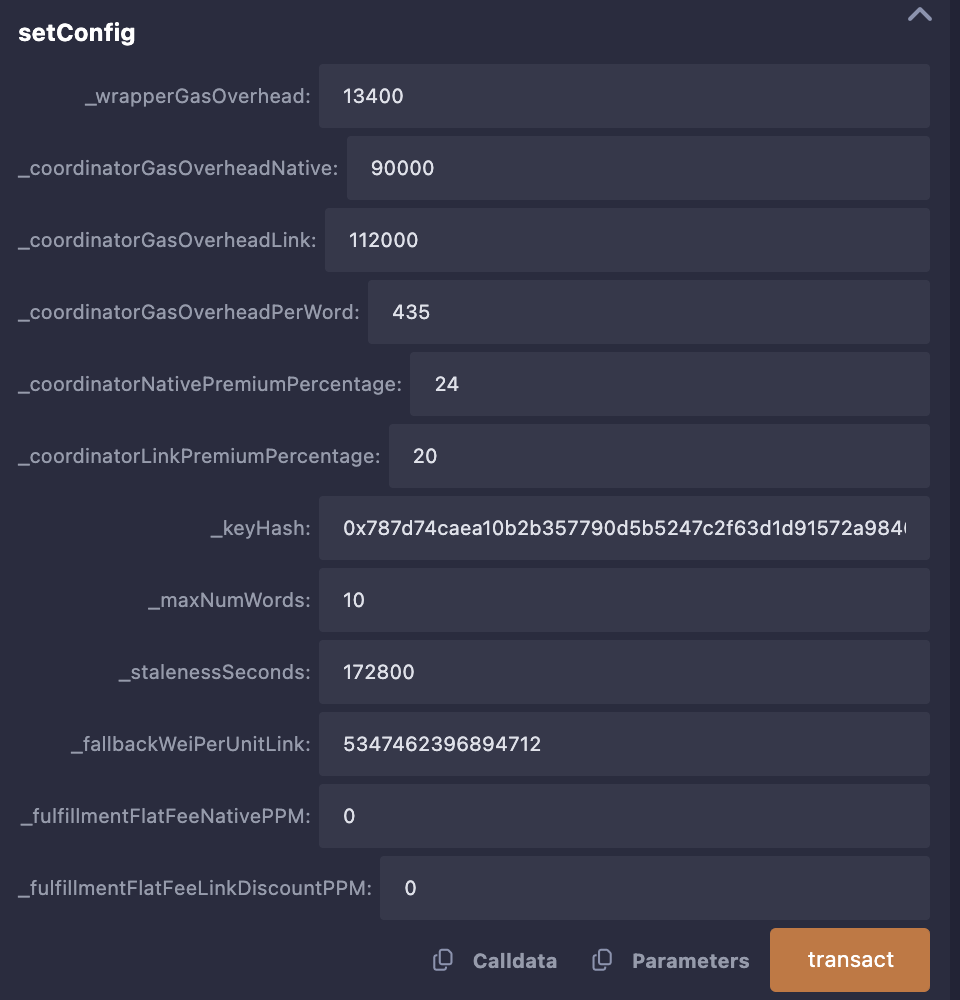
Click
setConfigand fill in the following parameters. You can find the wrapper addresses for all supported networks on the Supported Networks page with links to the block explorer. In the block explorer, select Contract and Read Contract, then expand thegetConfigfunction and click Query. For Sepolia, the config values are found here in Sepolia Etherscan and are also listed below:-
_wrapperGasOverheadwith13400 -
_coordinatorGasOverheadNativewith90000 -
_coordinatorGasOverheadLinkwith112000 -
_coordinatorGasOverheadPerWordwith435 -
_coordinatorNativePremiumPercentagewith24 -
_coordinatorLinkPremiumPercentagewith20 -
_keyHashwith0x787d74caea10b2b357790d5b5247c2f63d1d91572a9846f780606e4d953677ae -
_maxNumWordswith10 -
stalenessSecondswith172800 -
fallbackWeiPerUnitLinkwith5347462396894712 -
fulfillmentFlatFeeNativePPMwith0 -
fulfillmentFlatFeeLinkDiscountPPMwith0Note on these variables:
-
_wrapperGasOverhead: This variable reflects the gas overhead of the wrapper's fulfillRandomWords function. The cost for this gas is passed to the user. -
Coordinator gas overhead: These variables reflect the gas overhead of the coordinator's
fulfillRandomWordsfunction. The cost for this gas is billed to the VRFV2PlusWrapper subscription and must, therefore, be included in the VRF v2.5 direct funding requests pricing._coordinatorGasOverheadLink: Coordinator gas overhead when paying for VRF requests with LINK._coordinatorGasOverheadNative: Coordinator gas overhead when paying for VRF requests with native tokens (in this case, Sepolia ETH)._coordinatorGasOverheadPerWord: Additional coordinator gas overhead amount per random value ("word") requested from VRF.
-
Premium percentage: These variables are the premium ratio in percentage. For example, a value of 0 indicates no premium. A value of 15 indicates a 15 percent premium.
_coordinatorLinkPremiumPercentage: Premium percentage when paying with LINK._coordinatorNativePremiumPercentage: Premium percentage when paying with native tokens.
-
_keyHash: The gas lane key hash value is the maximum gas price you are willing to pay for a request in wei. -
_maxNumWords: This variable is the maximum number of words requested in a VRF v2.5 direct funding request. -
stalenessSeconds: The time threshold past which the price feed is considered stale, and we must use thefallbackWeiPerUnitLinkvalue instead. -
fallbackWeiPerUnitLink: The conversion value used if the price feed is stale. -
Fulfillment flat fees: Additional flat fees applied on top of the premium percentage. Currently, these parameters are both set to zero for both LINK payments and native token payments, respectively:
fulfillmentFlatFeeLinkDiscountPPMfulfillmentFlatFeeNativePPM
-
-
Click transact.
-
A MetaMask popup will open. Click Confirm.
Fund the VRFV2PlusWrapper subscription
When deployed, the VRFV2PlusWrapper contract creates a new subscription and adds itself to the newly created subscription.
-
Under Deployed Contracts, open the functions list of your deployed VRFCoordinatorV2_5Mock contract.
-
Click
fundSubscriptionto fund the VRFV2PlusWrapper subscription. Fill in your subscription ID for_subid, and set the_amountto10000000000000000000(10 LINK). -
A MetaMask popup will open. Click Confirm.
Deploy the VRF consumer contract
DirectFundingConsumerV2_5 is the consuming contract that requests and directly pays the VRF service for random values.
-
In the file explorer, open DirectFundingConsumerV2_5.sol.
-
Under DEPLOY & RUN TRANSACTIONS, select DirectFundingConsumerV2_5.
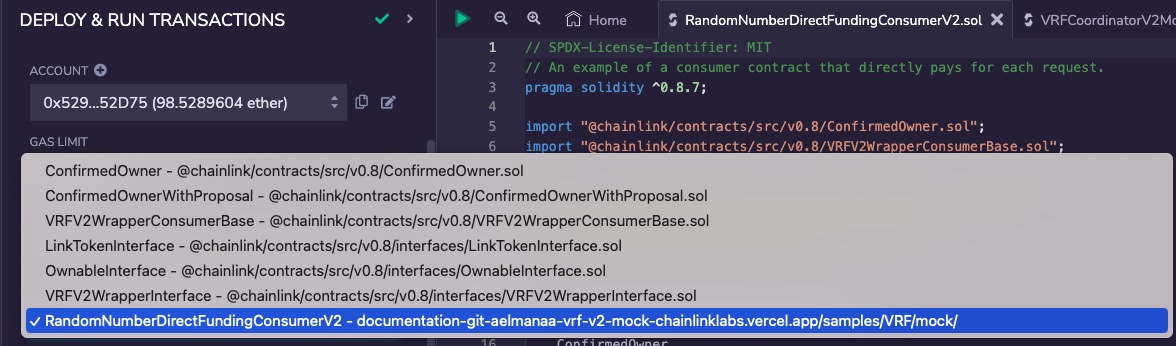
-
Under DEPLOY, fill in
_WRAPPERADDRESS_with the deployed VRFV2PlusWrapper address. -
Click transact to deploy the DirectFundingConsumerV2_5 contract.
-
A MetaMask popup will open. Click Confirm.
-
Once deployed, you should see the DirectFundingConsumerV2_5 contract under Deployed Contracts.
-
Note the address of the deployed contract.
Fund your VRF consumer contract
Use the LinkToken contract to transfer LINK to your consumer contract:
-
Under Deployed Contracts, open the functions list of your deployed LinkToken contract.
-
Click transfer and fill in the
_towith your consumer contract address and_valuewith LINK tokens amount. For this example, you can set the_valueto10000000000000000000(10 LINK).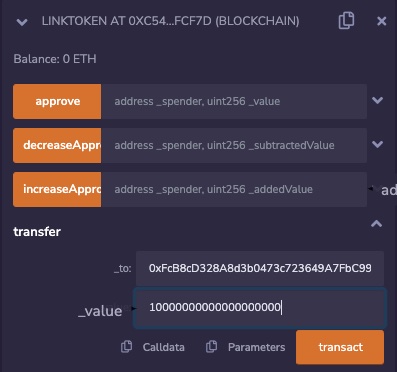
-
Click transact.
-
A MetaMask popup will open. Click Confirm.
Request random words
Request three random words:
-
Under Deployed Contracts, open the functions list of your deployed DirectFundingConsumerV2_5 contract.
-
In
requestRandomWords, fill in_callbackGasLimitwith300000,_requestConfirmationswith3and_numWordswith3.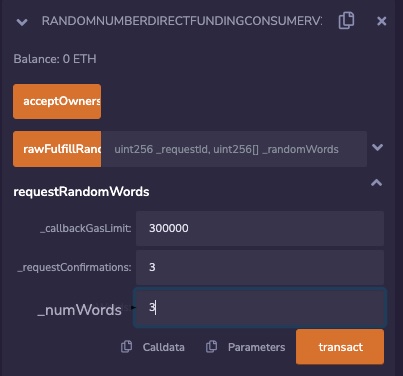
-
Click transact.
-
A MetaMask popup will open.
-
Click Confirm.
-
In the Remix IDE console, read your transaction logs to find the VRF request ID. In this example, the request ID is 1.
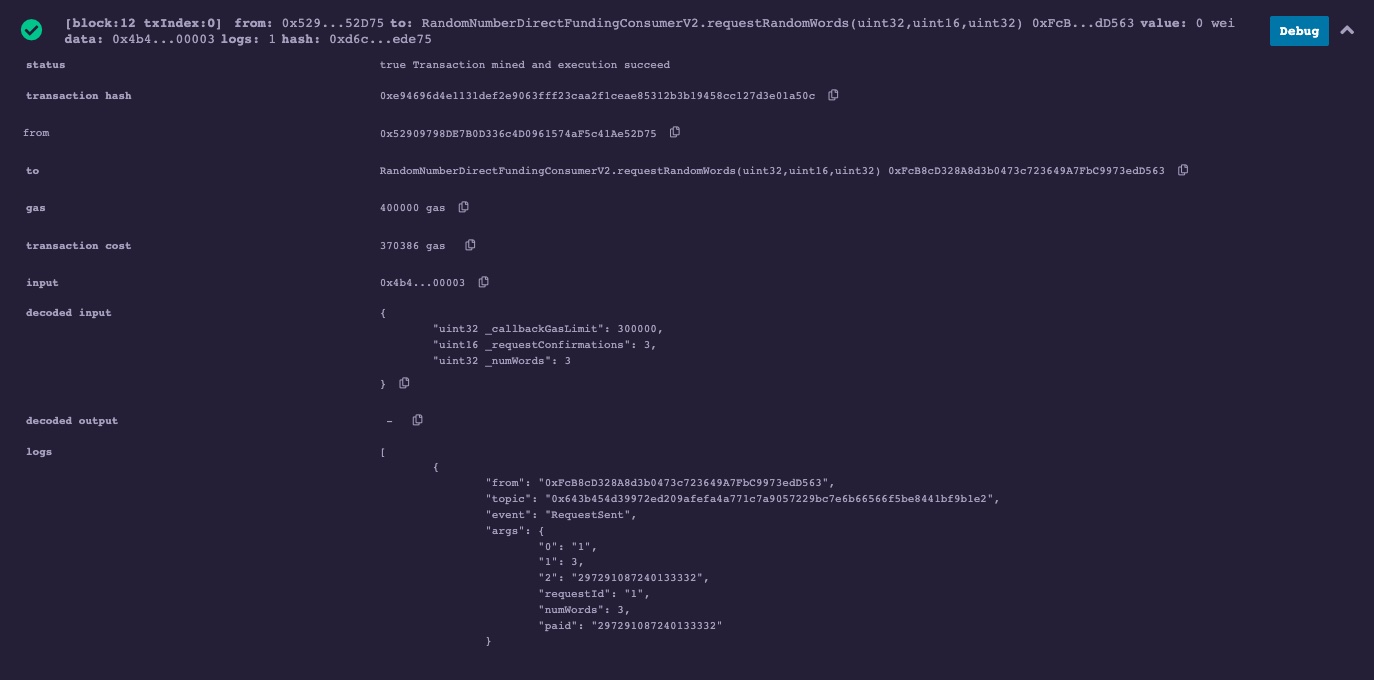
-
Note your request ID.
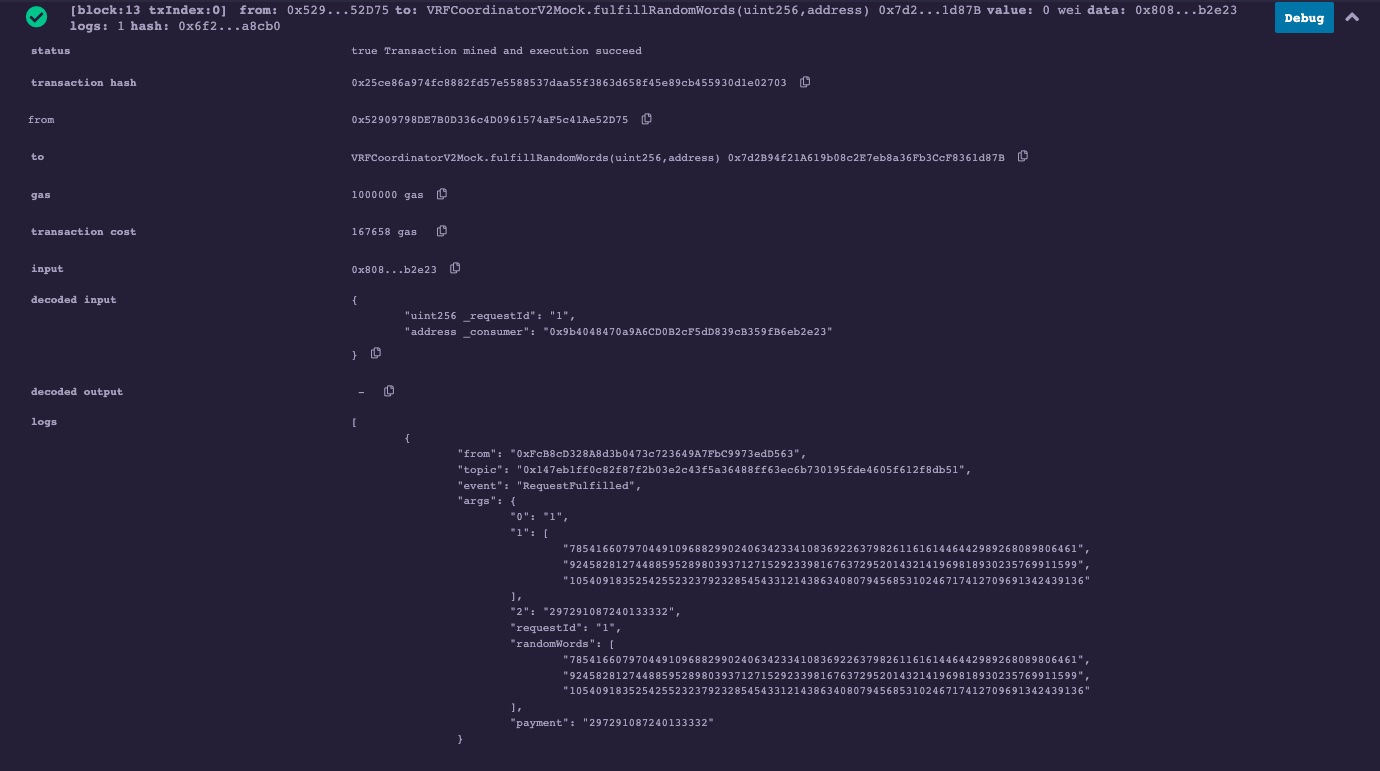
Fulfill the VRF request
Because you are testing on a local blockchain environment, you must fulfill the VRF request yourself.
-
Under Deployed Contracts, open the functions list of your deployed VRFCoordinatorV2_5Mock contract.
-
Click
fulfillRandomWordsand fill in_requestIdwith your VRF request ID and_consumerwith the VRFV2Wrapper contract address.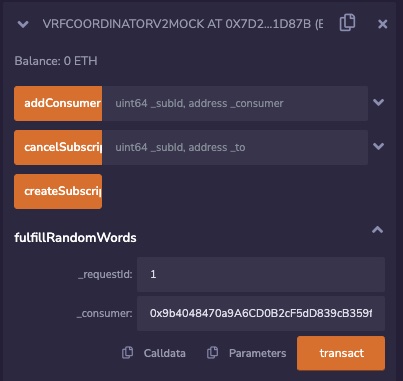
-
Click
transact. -
A MetaMask popup will open.
-
Click Confirm.
-
In the Remix IDE console, read your transaction logs to find the random words.
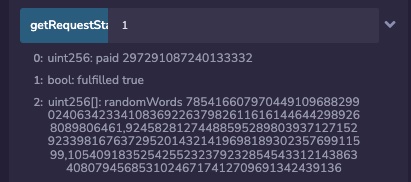
Check the results
-
Under Deployed Contracts, open the functions list of your deployed DirectFundingConsumerV2_5 contract.
-
Click
lastRequestIdto display the last request ID. In this example, the output is 1.
-
Click
getRequestStatuswith_requestIdequal to1:
-
You will get the amount paid, the status, and the random words.
Next steps
This guide demonstrated how to test a VRF v2.5 consumer contract on your local blockchain. We made the guide on Remix IDE for learning purposes, but you can reuse the same testing logic in other development environments. For example, you can test entirely with the Hardhat Starter Kit RandomNumberDirectFundingConsumer unit tests.